Saturday 20 October 2012

Shutter Speed

Alongside DOF, another of the key elements of exposure control is Shutter Speed.  This is usually measured in units of Exposure Value.  The shutter speed controls how long the sensor or a film plane is exposed to light.  Shutter speed is measured in seconds and fractions of a second.  The photographer has greater flexibility to determine how long they want to expose the sensor to light, depending on the effect or result they would like to achieve - whether 1/200 of a second (very fast shutter speed) or 1/4 second (very slow shutter speed - long exposure).  Another setting for controlling shutter speed is BULB. This allows the photographer to determine how long they want to keep the shutter open.   
Using shutter speed you can freeze movement and works well with waterfalls, sports or any fast moving subjects.  Slow shutter speed is also great for deliberate motion blur and low light photography as well as catching light trails when doing night photography.  To minimise blurring when shooting with a long shutter speed it is important to use a tripod, although Image Stabilisation also helps to keep the image in focus.  These days the semi automatic setting Shutter Priority in digital cameras allows you to set the shutter speed and the camera determines the rest. 
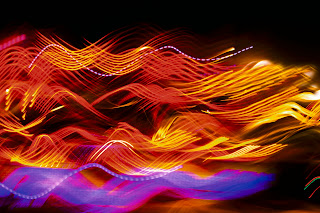
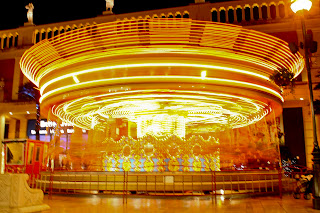
I discovered the joys of playing with shutter speed when one cold November evening I decided to do some photography during bonfire night.  I wanted to initially photograph fireworks but being a complete novice I was unprepared and did not have my tripod with me.  So I thought I could try photographing the fairground rides.  At first I was pretty unimpressed with the results and they didn't blow me away.  But then I started playing around with shutter speed and started using very long shutter speed whilst adding movement when photographing the rides - I was pretty ecstatic with what I achieved! I ended up with something pretty amazing and very abstract.  I loved the way the lights came alive and took their own shape - each one beautifully unique in it's own way.
Experimenting with shutter speed can be a great way to feed your photographic creativity and manipulate the visual effects of the final image.
Some of the images below from the Debdale park fairground rides. I love the dramatic structures, colours and shapes of the images. To me they convey drama, speed and excitement.  
f8, 1/8th, ISO 200, 39mm


f8, 1/8th, ISO 200, 55mm


f8, 1/6th, ISO 200, 55mm


                                                                              f6.3, 1/8th, ISO 200, 21mm - Barton Square at Xmas


Tuesday 16 October 2012

Depth of field - Sebastiao Salgado

Sebastiao Salgado is one of the masters of social documentary photography.  Born in 1944 in Brazil, he initially trained as an economist.  He often travelled to Africa as part of his work and this is when he started to take an interest in photography.  In 1973 he abandoned his career as an economist and took up photography.  He travelled to Africa to document the famine travesty there.  He joined the international cooperative of photographers Magum Photos in 1979 but left in 1994 to start his own agency, with his wife, Amazonas Images.
Salgado has won numerous photographic prizes and is most famous for his social documentary images of workers in less developed countries. 
Most of his images are black and white and are quite are dark and moody.  Salgado's images show a moment in passing, even if the subjects appear to be still in the image.  Salgado's images go beyond the realm of photo journalism - they show real engagement with the subject and tries tell the story with greater complexity.  Salgado often documents images over several years.  His images are technically brilliant and each image gives a small glimpse of the real story that lies behind each photograph.  Although a champion of documentary photography, Salgado's images are very aesthetically pleasing and sometimes considered too beautiful.     
          
This is a really good example of shallow depth of field - the person in front is clearly in focus and the two people behind are slightly out of focus


This is one of my favourite images - beautiful silhouetted people against the mist and the haze.  The texture and contrast, dark and shade makes you linger on this image - makes you think about their journey and what lies beyond

Depth of Field - Ansel Adams

Ansel Adams was born in 1902 in San Francisco, California.  He was best known for his black and white photographs of the American West, especially Yosemite National Park.  Adams, along with Fred Archer developed a technique called Zone System. It was the best way to ensure optimal film exposure and development.  This resulted in images with excellent clarity and depth.  Adams preferred using large format cameras as their high resolution guaranteed sharpness to his images.  Adams was one of the founders of Group f/64 - a group made up of photographers who shared the same photographic style of sharp focused and carefully framed images.   
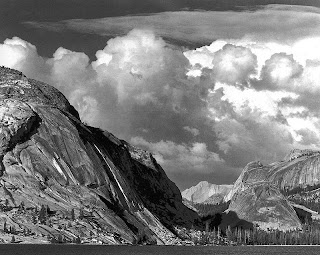
Most of Adams images are of landscape, which requires a large depth of field or deep focus, this allows for the entire image to be in focus. 


Some of his images show the breathtaking beauty of nature and landscape.  The images guide you through the shapes, texture and beautiful lines of nature. 


Monday 15 October 2012

One sunny day in Manchester

On Friday 12th October we had a trip out to Manchester city centre with one of the day groups.

Even though it was a great day for photography - the sun was shining and the first of the autumn leaves were falling, I was struggling for inspiration!

Below are just a few of my images from the day - I'm not overly pleased with them all as I know I've done better but it's all good practise!


I thought this picture made for a beautiful autumn scene - I love the brightly coloured yellow leaves on the ground which marks arrival of the new season


I suddenly saw the pigeons take flight! Unfortunately I had the wrong settings and the original was over exposed. Tweaking the image did not improve it a great deal but I still like the way I've managed to capture some of the action


I wasn't too happy with the composition of the original image so I have cropped the image to highlight the birds and actions, rather than the sourroundings.


 I decided to photograph this couple as they were going past this window.  I thought this would be a good test shot for the shadows and reflections themes I'm exploring for one of my briefs.  The image hasn't turned out that bad - although, the original was under exposed - difficult to quickly get the camera setting right and capture a fleeting moment!


 I turned this image into black and white as I didn't want the background colours to distract from the main subject.  As I normally prefer non human photography, this was a good way to practice capturing expressions, movements and body shapes.  This image also has a good shallow depth of field


I was sat front of this woman but strangely she did not notice the camera going off - I think it's great the way she looks lost in her own thoughts 
 

Monday 8 October 2012

Depth of Field - Aperture

To understand the basics of photography you need to understand exposure.  Exposure is the amount of light collected by the sensor when taking a single picture.  If the shot is under exposed then the image will appear too dark, whereas if it's over exposed then it will appear too bright or washed out. 
File:Aperures.jpg
http://en.wikipedia.org/wiki/File:Aperures.jpg
There are three adjustable elements of camera setting that allows you to control exposure - these are Aperture (the size of the lens opening - that  lets light in to the camera, also known as the diaphragm) , ISO (the cameras sensitivity to light) and Shutter Speed (the length of time the sensor is exposed to light) 
For now I will be looking at aperture.  The aperture setting allows you to control depth of field - the part of the image actually in focus - or the distance between the nearest and farthest object in focus.  Aperture setting is indicated by f-numbers - each f-number represents a 'stop' of light. 
A small f-number such as 2.8 will allow for a huge amount of light to pass through the lens.  This is  known as a large aperture and results in images with shallow depth of field - this is when the subject in the foreground is clearly in focus and the rest of the background is out of focus.  At a higher f-stop such as f22 a very small amount of light will pass through the lens due to the small opening of the diaphragm, even with a longer shutter speed. 
Shallow depth of field is commonly used in macro photography - so flowers, insects, fruits and vegetables etc. It can also be used when doing close up portraiture - this helps to blur out the distracting background and puts the focus or attention on the subject being photographed.
We did some practise shallow depth of field photography in class but being a perfectionist I wasn't very happy with them so decided to do my own at home.  Below you can see the results -
I decided to photograph the tomatoes as they're very colourful and look very aesthetically pleasing. They were also very good for demonstrating shallow and narrow depth of field. 
In all the images I kept the white balance to sunny as it was a very bright day and also kept the focal length to 55mm and the ISO to 100.  I only changed the aperture and the shutter speed. 

  
f 2.8, 1/100th, ISO 100, 55mm
This image clearly demonstrates shallow depth of field as the only tomato in focus is the one in front.


f 8, 1/30th, ISO 100, 55mm
As I changed the aperture to f8 more of the tomatoes started to come in focus. 


f 22, 1/5th, ISO 100, 55mm

At f22 all the tomatoes are now in focus.  Higher f-numbers are usually used when photographing landscape as you want everything in focus.


The two images below demonstrate how shallow DOF can look pretty amazing when doing macro photography.  I took these images when I was in St Anne's and used my 70-300mm at full focal lenght. 

f8, 1/250th, ISO 100, 300mm


f8, 1/200th, ISO 100, 300mm

DOF can be used to great effect and many photographers have done so in their images.  I will discuss this further in my next blog. 

Sunday 7 October 2012

Different types of camera

The ever growing fascination with capturing the day to day activities of our lives and sharing those moments with the wider world has made the camera an essential everyday item and very central to everything we do.
Most of us believe there are only two types of cameras - digital and film, when in fact there are many different types of cameras out there, and they are made of equally diverse materials such as wood, steel, plastic and titanium.  The major difference between digital and film cameras is the surface where image is recorded - a traditional camera will use film and a modern digital camera will use an electronic sensor.   
Pinhole cameras - camera obscura
A Pinhole camera also known as camera obscura can be made using some common household objects such as a can or a box.  The camera is a light-proof box with a small hole on one side, where the light passes through this hole to project an image of the outside world on the opposite side of the box.  This is a camera without lens and with a single small aperture.  Pinhole cameras require a lengthy exposure, which varies from 5 seconds to several hours.  Pinhole cameras are used to capture the movement of the sun over a long period of time.  Muslim scientist Ibn al-Haytham was the first person to successfully project an outside image to a screen using several different light sources.  He first wrote about the camera obscura and pinhole camera in his Book of Optics in 1021 AD.


Single use cameras/disposable

These are the most cheapest, simplest and easiest to use cameras.  They will have a roll of film inside and are usually recyclable.  These types of cameras have a fixed focal length and a single shutter speed.  Some of the features in these cameras includes built in flash and water resistance.  These cameras are good for some one off photography when you don't have access to any other cameras.  The whole camera needs to be taken in to the shop for printing.  The camera is recycled/disposed of once the film has been processed.    
Compact Lens Shutter cameras

Compact cameras either have a single focal length, dual focal length or zoom.  They mostly have automatic settings for focus and exposure.  These types of cameras also have a built in flash.  They are one of the most popular camera types and are suitable for most consumer needs.  These cameras are an inexpensive alternative for many people who don't consider themselves as serious photographers.  Point and shoot cameras are great for events, parties and holiday snaps.  The low end compact cameras are similar to disposable cameras and have fixed settings and features which gives very little room for controlling the end result.  Although the higher end ranges have many features which allows for greater control      


Bridge cameras

There's been a growing popularity for Bridge cameras and great for those who want the advantage of a lightweight compact camera with the added features of a DSLR.  Bridge cameras are there to fill the gap between compact cameras and DSLR's.  Bridge cameras normally lack an optical viewfinder and a smaller ISO sensitivity because of the smaller image sensor.  Although Bridge cameras do not have interchangeable lenses, unlike the DSLR, which has a variety of lenses with different focal length, Bridge cameras have a long zoom lens, which can range up to 600mm. 


Rangefinders

Rangefinders are compact and lightweight and are fitted with a rangfinder.  They became very popular during the 1950's.  Leica cameras are the most popular and expensive rangefinders available today.   The rangefinder works by focusing on dual image and when a ring is turned the images are fused ensuring perfect focus.  Image is focused and composed through a window on the top right, similar to a compact camera.  Rangefinders tend to have higher image quality due to not having a flipping mirror, and results in less vibration and blurring of images when hand holding during slow shutter speeds.  Masters of photography such as Cartier-Bresson and Salgado prefer using Rangefinders to DSLR's.  With Rangefinders you won't know what you're getting until you see the final image and also everything is always in focus so no hint of depth of field.  They are not very good with Macro or telephoto lenses.  And they also need regular servicing.       

Twin Lens Reflex
This is a medium format camera - one that uses film larger than 35mm, thus producing higher quality of image.  Twin lens means exactly what it says - two lenses - one mounted atop another with exactly the same focal length.  Focus and composure is through the top one and take the picture with the bottom one.  TLR cameras are mush more mechanically simpler than DSLR's and also cheaper.  TLR's are also less noisy and has reduced shutter lag.  The disadvantages are very few offer interchangeable lenses. It also has limited shutter speed as well as not being able to view depth of field as the camera has no diaphragm.      


Single Lens Reflex

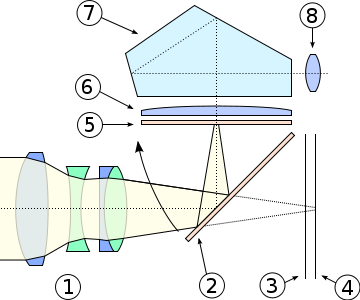
An SLR or DLSR (Digital SLR) is the most popular type of camera in the market today.  It has a reflex mirror that bounces light from the lens on to the flat ground glass screen.  A DSLR has a 35mm, APS or 4/3 size CCD or CMOS sensor which captures the image. 
Cross-section view of a DSLR. Electronics and display not shown.
File:SLR cross section.svg
  1. Camera lens
  2. Reflex mirror
  3. Focal-plane shutter
  4. Image sensor
  5. Matte focusing screen
  6. Condenser lens
  7. Pentaprism/pentamirror
  8. Viewfinder eyepiece
http://en.wikipedia.org/w/index.php?title=File:SLR_cross_section.svg&page=1


DSLR's have grown in popularity mainly because they allow the user greater control and flexibility over the image they capture.  They also have interchangeable lenses and are great for fast moving sports/action, nature or wildlife photography as well as studio photography.  You can also use a huge range of lenses such as Macro, telephoto and fisheye.  DSLR's offer larger sensor sizes in high end models and some latest models offer live view and HD video capture.  These days DLSR's have many accessories such as flash guns, triggers, remotes and various types of filters to enhance and improve the image capture experience.   


Location Photography

In simple terms the definition of location photography is the art of capturing images of anything outside a studio.  Location photography can be anything from landscape, seascape, cityscape to architecture, events, street photography, nature, portraits and objects - the list is endless - when it comes to location photography, the world is your lobster!  
 
There are many genres and sub genres to location photography.  The spider diagram I did in class demonstrates how many areas of location photography are inter-linked - and the possibilities are limitless.  I will delve further into location photography for my Exterior and Interior location brief.